
|
All trademarks and registered trademarks used herein are the property of their respective owners. Reproduction in whole or in part in any form or medium without express written permission by Anycpu.com is prohibited. |
Microsoft Windows XP ProfessionalOverview
Initially installed Windows XP Professional Full Version 2002 with Windows XP Service Pack 1. Windows XP Service Pack 2 was installed in December 2004. Installation Utilities CDThis installation guide recommends to create a CD-R with the following contents needed for Windows XP installation prior to enabling an Internet connection:
Bootable Installation CD with Integrated XP Service Pack 2Windows XP without service pack only recognizes 137 GB of the hard disk and a larger disk cannot be formatted completely. Therefore, a slipstreamed, bootable CD of Windows XP including the latest service pack was created using the Autostreamer method. Product Keys and CD types cannot be mixed & matched. For example, you cannot use an OEM product key with a full version Windows XP CD, and vice versa. Automated Service Pack IntegrationCreate slipstreamed CD with Autostreamer and then burn ISO image to CD‑R using Stomp RecordNow Max software (or any other CD-R writing software.) Manual Service Pack IntegrationInstead of the automated method, a bootable Windows XP CD with integrated Service Pack 2 can be created using these slipstreaming instructions. The CD creation process is a little easier when using a Windows XP Service Pack 2 CD (available free from Microsoft) instead of the downloaded SP2 file. With Stomp RecordNow Max you cannot specify the correct options for a bootable Data disc (disc type “no emulation”, load segment 0x7c0, sector count 4), and therefore the created disc is not bootable (error code 4.) Some other CD-R writing software, e.g. Nero Burning ROM must be used. Windows XP InstallationBecause USB devices may not always be recognized during the installation, a PS/2 keyboard and mouse were temporarily connected during OS installation. The installation guide for Windows XP and drivers was followed. Caution regarding extra hard disks, ZIP drives: “When you install Windows, make sure that all hard drives and ZIP drives are disconnected apart from the one you're trying to install to. This is because the installation program automatically assigns drive letters to all the partitions that it finds, but at that stage you can't choose which letter it gives to which partition. If it happens to call the one you're trying to install "D" then you're stuck with it and that partition will always think that it's "D". Trying to change it to "C" after the installation is asking for trouble.” Boot from the Windows XP with SP2 CD. In
the “Welcome to Setup” menu press Windows XP Configuration
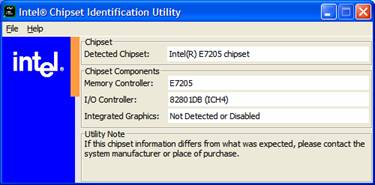
The standby and hibernate features in the control panel power options are only available after the video driver has been installed. Chipset SoftwareAfter the installation of Windows XP the following steps were performed using the installation utilities CD.
After
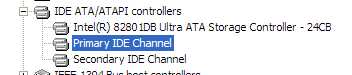
uninstalling IAA open the Device Manager and check that all
devices connected to the two IDE channels are set to “DMA
if available”. USB 2.0 SupportThe USB2.0 driver update steps recommended by ASUS were not performed. The latest Intel chipset software configures the USB2.0 controllers to use the correct Intel USB drivers. DirectX 9Install DirectX from the installation utilities CD. This is optional, if the installed Windows XP Service Pack already contains the latest DirectX version. Windows XP SP2 includes DirectX9.0c. Test the DirectX installation: Run LAN Drivers and WAN connectionInstalled the Broadcom NetXtreme Gigabit Ethernet Software for the BCM5702 NetXtreme Gigabit Ethernet Adapter from the installation utilities CD:
If there is no network router, create a DSL broadband connection using built-in XP PPPoE[3] drivers. With a network router in place, PPPoE can run in the router and there is no need to define a "broadband connection" in XP. The default local area connection will suffice to connect to the network router. Tweak and test your DSL connection at http://www.dslreports.com/:
Windows UpdatePrior to XP SP2, critical updates needed to be downloaded from the Windows Update site. With XP SP2, just enable Automatic Updates and wait for the necessary updates to be offered for downloading and installation. Video Drivers(12/26/05 - Update) Installed ATi video drivers Catalyst 5.13. Various sources recommend turning off the Fast Writes option of the ATi SmartGard tab in the advanced display adapter settings. Turning Fast Writes on may cause a driver crash. There is no adverse effect to performance if Fast Writes are turned off. The standby and hibernate features are now displayed in the control panel power options.
Optional ATi SoftwareIn my opinion the only useful components of the ATI Multimedia Center are the DVD decoder and the TV application. The Windows Media Player is superior to the other components of the ATI Multimedia Center. Sound DriversRealtek On-board Sound(Optional) The drivers for the on-board sound chip were installed from the Installation Utilities CD. First install the WDM audio driver and then install the Media Player. Configure the speakers. Afterwards, there are no more problem devices in the Device Manager. Audigy 2 Sound CardThe on-board sound chip was disabled before the Audigy 2 sound card was installed. The drivers for the on-board sound chip were uninstalled. The drivers from the product CD need to be installed first. I chose to skip the installation of MiniDisc Center, Audio Stream Recorder, Getting Started Demo, MediaSource. Enabled Auto Update at the Creative website and installed all recommended updates for the WDM drivers. The Speaker Settings software was updated manually. After Windows XP Installation
The latest driver for the 990c from HP does not work with the LPR print server[4] of my SMC network router. The earlier 990c printer driver version that comes with Windows XP functions adequately. However, that driver version does not reliably support double-sided printing. Windows XP ActivationActivation can be delayed up to 30 days. Later activation is recommended if system devices are still changing. Reactivation is not problematic as long as major hardware components have not changed. Wake On LANWake On LAN[5] (a.k.a. Remote Wake Up) is a standard that allows you to turn on a computer from another location over a network connection. The power supply, main board, and integrated network adapter used for this PC are able to support Wake On LAN. The following configuration steps were performed to enable Wake On LAN from all power states:
Resources: Notes [1] There are various benefits and disadvantages of single and multiple partitions on the same physical disk drive. In my opinion the advantages do not justify the extra work to establish and maintain several partitions, at least for NTFS. [2] It is unclear what the benefits of IAA really are. Without it, hibernating the system takes only ½ to ⅓ the time. IAA is no longer installed after the upgrade to Windows XP SP2. [3] Point-to-Point Protocol Over Ethernet (RFC 2516). The Point-to-Point Protocol (PPP) provides a standard method for transporting multi-protocol datagrams over point-to-point links. PPPoE describes how to build PPP sessions and encapsulate PPP packets over Ethernet. [4] With Windows 2000 and
XP, there are two varieties of "LPR" ports: |
|


Last modified: 09/23/2006